So far so good for access to the new Cat Cam: from within the house we can view video from the cats’ shed, yet the camera is safely on its own DMZ.
In this final post I’ll show how I made the camera video feed available on the Internet.
One thing I wanted from the outset was for Internet clients not to make direct connections to the camera itself. I was a little worried about the ability of the web server and CPU in the camera to cope with multiple clients, and also the security implications of direct access. A second requirement was to have multi platform access – that is, desktop and iOS. This potentially means different streaming video formats.
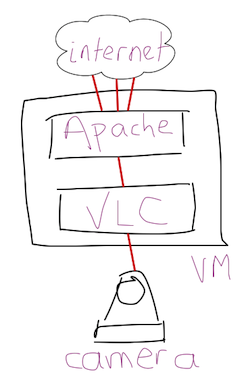
We have one linux server in the house, which is used for many different things and runs virtual machines. My back-of-an-envelope plan looked something like this:
First step was to create the VM, but remember that the camera feed is in a DMZ using a VLAN, so the VM must live there too. In KVM it’s possible either to send all traffic to a guest system and let it process the VLANs or, you can separate the tagged VLAN traffic in the host system so the guest is dumb and just sees untagged frames. Clearly the latter is preferable so that were the guest to suffer attack from the Internet, it ought not to be able to put traffic onto the house workstation network. The guest is completely within the DMZ.
With that done and a basic Ubuntu system installed, I started work on Apache and VLC (the Swiss Army Chainsaw of video processing). First up, VLC…
Luckily the camera’s video feed comes in MJPEG format with a discoverable URL. The idea is to take this feed, duplicate it, and transcode the respective feeds into something suitable for a desktop browser and for iOS. As a bonus, I’ll timestamp the video to make it easy to tell if the transcoder has crashed (the timestamp would be wrong). After a lot of reading online about how to configure VLC I came up with the following monstrosity:
/usr/bin/cvlc -I dummy http://guest:guest@172.16.30.10:8888/videostream.cgi?rate=0
  --sout='#duplicate{

    dst="transcode{
      width=320,heigh=240,fps=25,vcodec=h264,vb=256,acodec=none,
      venc=x264{profile=baseline,level=30,keyint=30,ref=1},
      sfilter=marq{marquee=\"[%Y-%m-%d %H:%M:%S]\",position=8,size=18}
    }:std{access=livehttp{
        seglen=10,delsegs=true,numsegs=5,
        index=/var/www/streaming/cats.m3u8,
        index-url=/streaming/cats-########.ts},
      mux=ts{use-key-frames},
      dst=/var/www/streaming/cats-########.ts}",

    dst="transcode{
      width=640,heigh=480,fps=25,vcodec=theo,vb=512,acodec=none,
      sfilter=marq{marquee=\"[%Y-%m-%d %H:%M:%S]\",position=8,size=18}
    }:http{mux=ogg,dst=127.0.0.1:8081/catcam.ogg}"

  }'
Of the two transcodes (“dst=”), the second is more straightforward. It creates an Ogg format stream using the Theora video codec, which modern browsers should be able to cope with. This is a video stream being served from VLC’s built-in web server, so I’ll need to proxy it via Apache. The configuration also applies a filter (“sfilter=”) to add a timestamp on the video stream.
The first transcode uses the new HTTP Live Streaming support in VLC. This is a rather elegant specification from Apple (which is why I selected it for the iOS clients) for simple and efficient delivery of streaming video. It creates a set of files and assumes you have a web server to serve them. The files each contain a few seconds of video, and the client retrieves them and plays one after another. The “######” templates an incrementing number within the segment filename. Again, the timestamp is added to the video stream.
CPU load for the above runs at about 60% (in the VM) on the dual core Athlon X2 245e processor. I wrapped the above in an Upstart init file, and just in case VLC gets its knickers in a twist, I added a cron job to periodically stop and start the service.
Now on to Apache. It needs to proxy the Ogg stream and serve the Live Streaming files, and prevent any other access to the web server:
# redirect any non-cat requests to the cat index.html
RewriteEngine on
RewriteCond %{REQUEST_URI} !^/streaming/cats.*
RewriteCond %{REQUEST_URI} !^/stream/catcam.ogg$
RewriteCond %{REQUEST_URI} !^/index.html$
RewriteRule ^(.*) http://%{HTTP_HOST}/index.html [R,L]

ProxyReceiveBufferSize 16384
ProxyRequests On
ProxyVia On
ProxyPreserveHost On

<Proxy *>
    Order deny,allow
    Allow from all
</Proxy>

# VLC server stream
ProxyPass /stream/catcam.ogg http://localhost:8081/catcam.ogg
ProxyPassReverse /stream/catcam.ogg http://localhost:8081/catcam.ogg
Last but not least for this server, we need a web page which offers up the two video streams. This uses an HTML5 video tag:
<!DOCTYPE html>
<html>
<head>
<title>Cat Cam</title>
<meta http-equiv="content-type" content="text/html; charset=ISO-8859-1">
<META HTTP-EQUIV="Pragma" CONTENT="no-cache">
</head>
<body>
<h1>Cat Cam</h1>
<video id="video" autoplay="autoplay">
<source src="/streaming/cats.m3u8">
<source src="/stream/catcam.ogg" type="video/ogg; codecs=theora">
Your browser doesn't appear to support the HTML5 <code><video></code> element.
</video>
</body>
</html>
All that remains is to enable a NAT rule and firewall pinhole on the home router for the web server (which is, of course, in the DMZ network connected directly to the router).
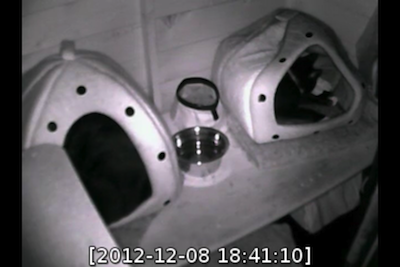
Let’s see the end result, taken on my iPhone this evening, also demonstrating the automatically activated night vision mode:
It’s nice to be able to check in on the wee beasties when I’m out at work. Other than a lot of reading about VLC, it wasn’t particularly difficult to do, and I think the end result is really quite good.

